Collapse
 

Ordered before 16:00? Same day shipping!

Our large stock makes it possible to ship orders quickly. If a product is not in stock, we are always able to offer a suitable solution so that, in consultation with the customer, the order will be delivered on time.


Everything available in own stock from our 5000 m2 warehouse

Our head office is located in the Netherlands, nearby the German border. This spacious building consists of two office floors and a warehouse of over 5000 m2. This is one of the reasons why we guarantee a minimum stock of 1000 racks!


Professional advice

You can reach us on weekdays by phone and chat from 8:00 to 17:00. We answer all your questions and provide you with professional advice. We can also be reached by e-mail.


Send with whitelabel

It is possible to include a custom-made shipping note to your shipment. All you have to do, is to send us an e-mail with your company logo and we will make sure that your shipments are sent with transparent tape and a shipping note with your logo.

Collapse Advantages
  • ✔ Ordered before 16:00? Same day shipping!
  • Available from stock from our 5000m2 warehouse
  • ✔ Professional advice
  • ✔ Send with whitelabel

UTP cabling information

Smooth or Rigid: Which UTP Cable Do I Need?

Smooth or Rigid: Which UTP Cable Do I Need?

When you are looking for a network cable on a roll, you will have to decide whether you want a cable with a smooth or rigid core. However, confusion often arises, and we frequently receive questions about this choice. The confusion is usually due to the terminology of "rigid cable" and "smooth cable." The terms rigid (Solid) or smooth (Stranded) are related to the core of the cable and do not indicate flexibility, as is often thought. Therefore, in this blog, we explain the differences and when you should choose a UTP cable with a smooth or rigid core.

Difference between a Smooth and Rigid Cable:

Verschil soepele en stugge kabel

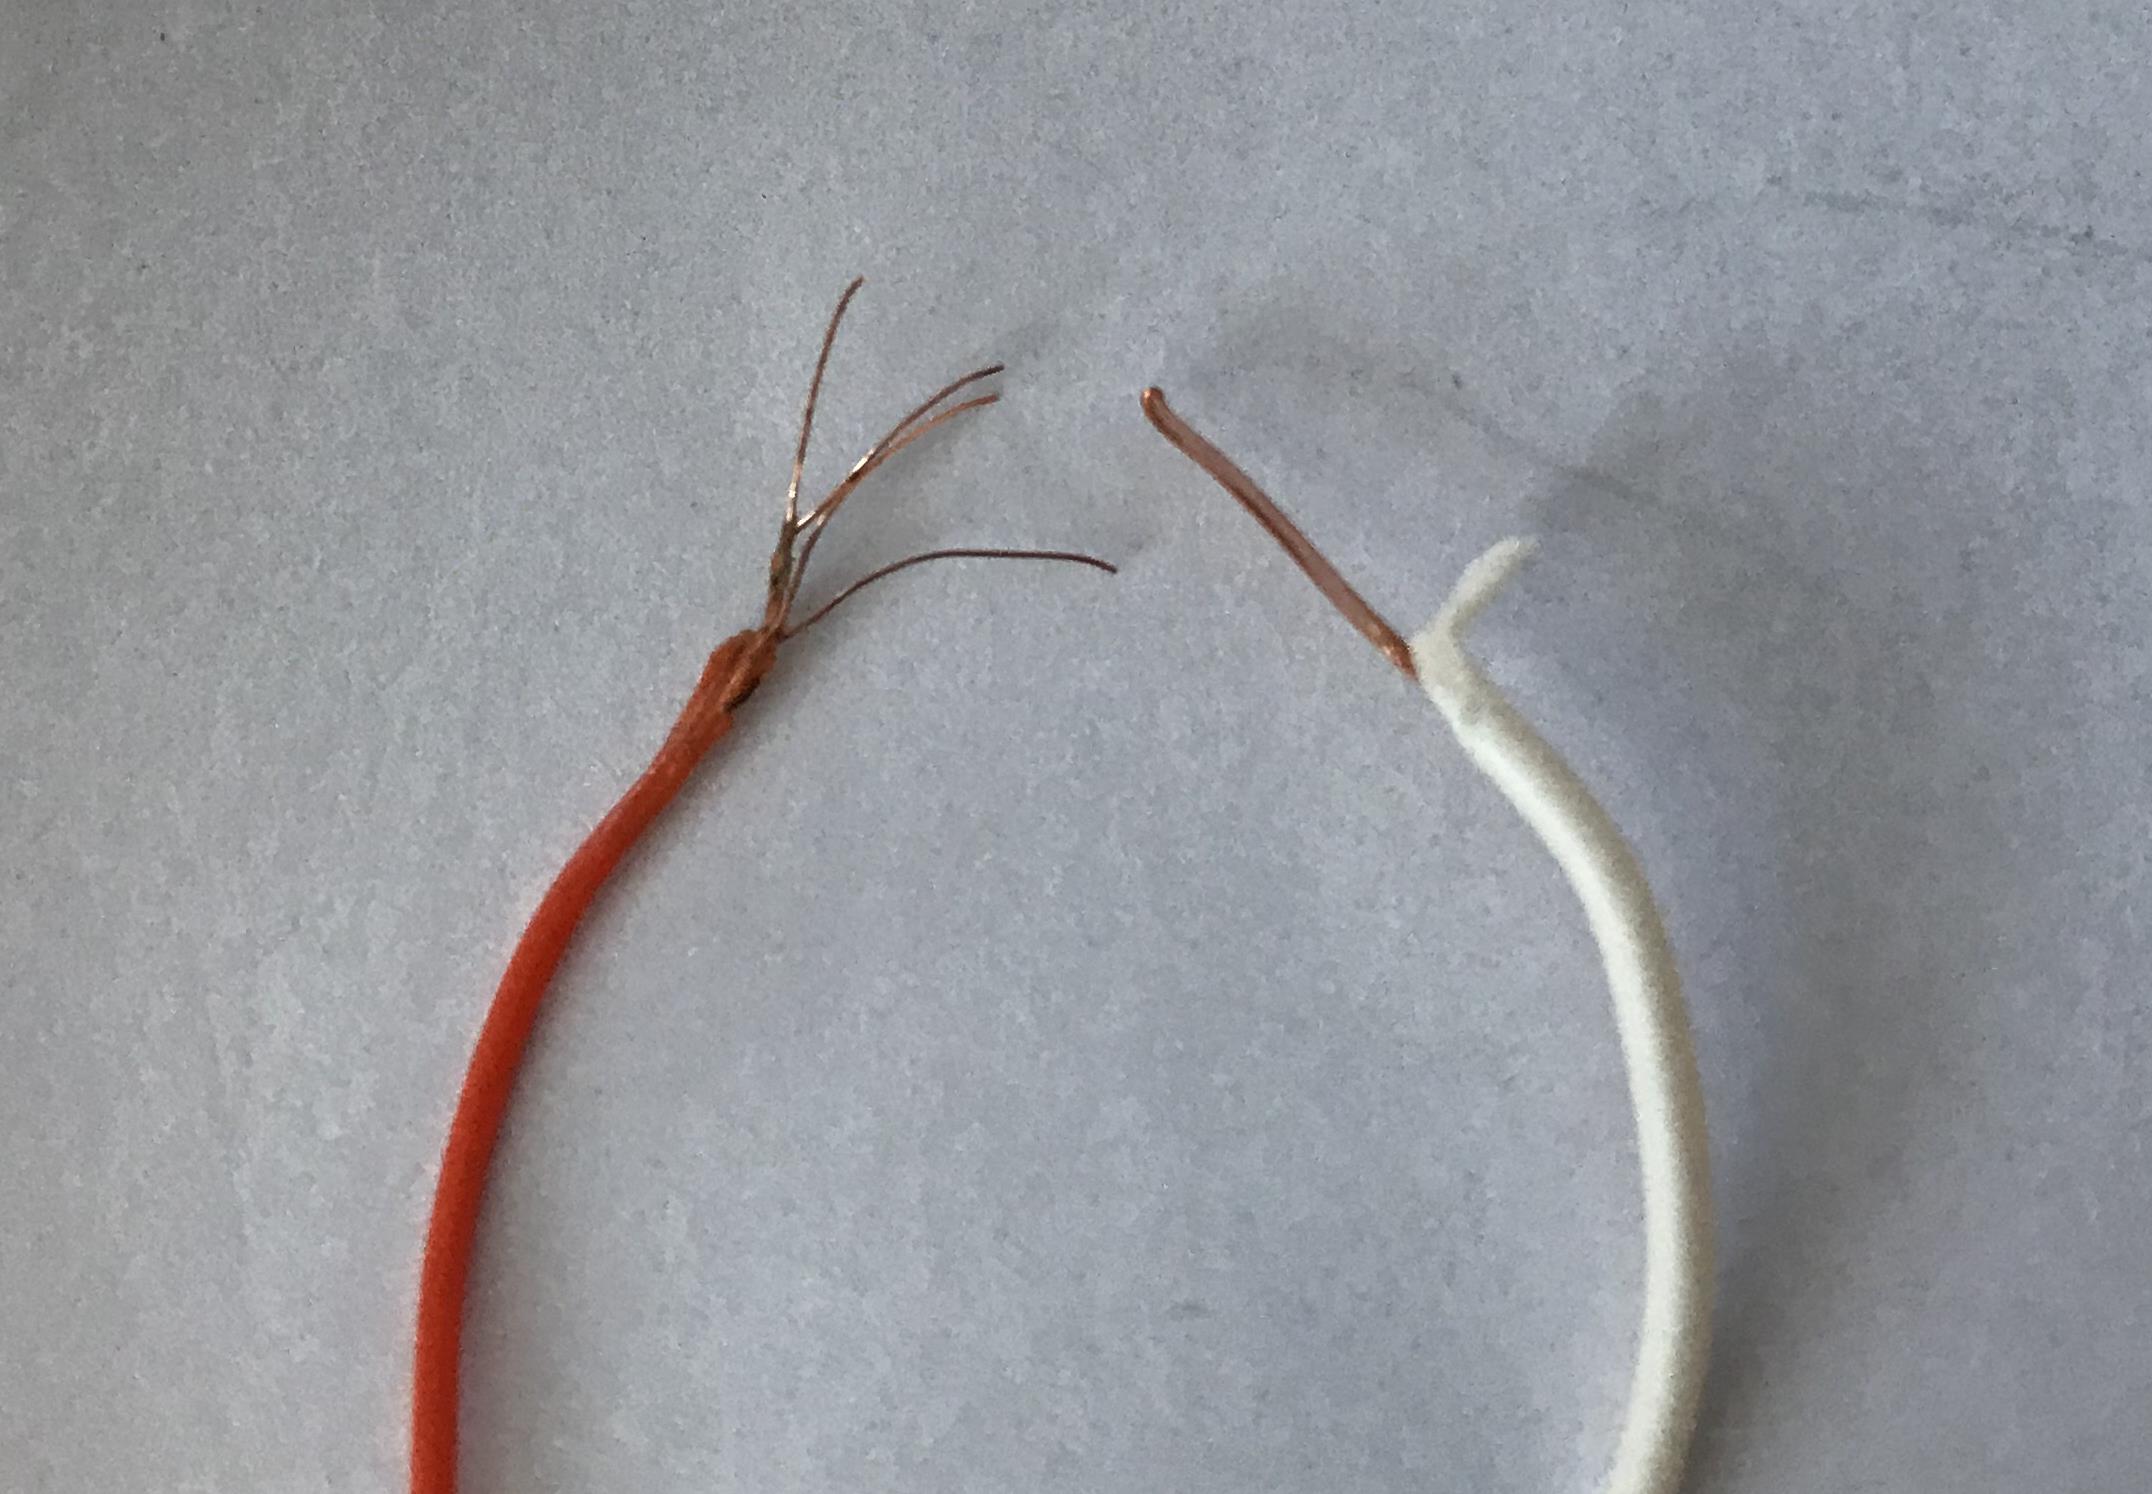
As briefly explained in the introduction, smooth or rigid relates to the core of the cable. UTP cables consist of four separate pairs of conductors, visible when the cable jacket is stripped. Each of these four pairs also has a "cable jacket" in different colors. The copper wiring transmitting the data signals is ultimately embedded in these four pairs. This is where the difference between a smooth and rigid core lies.


In a UTP cable with a smooth core, one of these pairs consists of very thin copper wires. In a UTP cable with a rigid core, one of these pairs consists of a single copper wire. If you strip the jacket of one such pair in both a rigid and a smooth cable, the difference is apparent. See the photo provided; the orange pair is from a cable with a smooth core, and the white pair is from a cable with a rigid core. 

When Do I Need a Smooth Cable?

Connectoren soepel vs stug

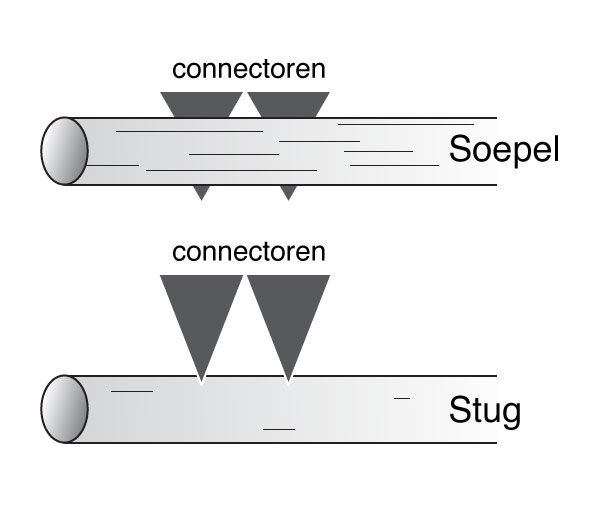
A cable on a roll with a smooth core is necessary when connectors will be mounted on both sides. This is because the connector's conductor, resembling small blades, goes completely through the conductor for an optimal connection, thanks to the very thin copper wires. With a rigid cable, it may happen that the blades of the connector do not go all the way through the copper wire or slip past it.

If it's necessary to mount a connector on a cable with a rigid core, be sure to choose connectors suitable for this purpose. A good crimping tool will establish a connection in 9 out of 10 cases, but it is never optimal.

When Do I Need a Rigid Cable?

If the cable on a roll needs to be mounted on an LSA strip, you always need a UTP cable with a rigid core. The rigid core adheres better for an optimal connection. LSA strips are found on, among other things, patch panels and wall outlets.

If the cable needs to be mounted on an LSA strip on one end and a connector needs to be attached to the other end, a rigid cable is also necessary.

Is There No Difference in Flexibility?

The difference in flexibility between a rigid and smooth UTP cable is negligible. Both cables are equally suitable for pulling through a conduit or making bends to prevent cable breaks up to a certain degree.

Everything you need to know about UTP cables can be found in our blog 'Which Cable Should I Choose?'. Here, you can read everything you need to know when looking for UTP cabling.

In Summary:

- If connectors will be mounted on both sides, choose a smooth cable.
- If the cable will be connected to an LSA strip, such as on a patch panel or wall outlet, choose a rigid cable.

Steps to Set Up a Wired Home Network

Steps to Set Up a Wired Home Network

Creating a wired home network depends on your specific needs, including the location, number of devices to connect, and the types of devices. This article guides you through the essentials of setting up a wired home network, providing a step-by-step process.

 What is a Wired Home Network?

A wired home network is established by connecting computers and network cables. The goal is to ensure a robust and stable internet connection for activities such as streaming, online gaming, and remote work. Let's walk through the steps of setting up a wired home network.


Note: A wired home network typically covers a maximum distance of 90 meters. For longer distances, consider using fiber optic cables.

 Requirements for a Wired Home Network

To install and set up a network, you need three main components:

  • Cables
    • Internet cables or
    • Patch cables
  • Tools
    • LSA punch-down tool or
    • Digitus terminal block pressing tool
  • Accessories
    • RJ45 connectors or
    • Keystones or
    • Wall outlets and/or patch panels or
    • Keystone media box
    • Optional: Switch or switches


Below, we'll explain each requirement in detail and help you make the right choices.

Choosing the Right Internet Cable

For a wired home network, use Cat5e, Cat6, Cat6a, or Cat7 cables. The higher the Cat rating, the more bandwidth and higher speeds the cable can achieve.


In network cables, you can choose between flexible or rigid cable. Flexible or rigid refers to the core of the cable and says nothing about the ductility of the cable. 


  • Choose a flexible network cable (patch cable) if you are terminating the cable with {blog_connectors}.
  • Choose a stiff network cable if you terminate this cable on {blog_wall sockets} or {blog_patch panels}


{cta_purchase_cat5e_cables} {cta_purchase_cat6_cables} {cta_purchase_cat6a_cables} 


So you can also choose patch cables. The advantage of patch cables is that you can often hide them nicely behind the baseboards. Patch cables are ordinary network cables with RJ45 connectors already attached to the ends. Do you choose a patch cable? Then you automatically choose a flexible cable.


Want to know more about a flexible or rigid cable? Read it in this article: Which cable should I choose?

Tip from our technician

Want a stable Internet connection at all times? Then go for a 100% copper network cable. The core is made entirely of copper, which guarantees that the signal is routed in the best possible way. As a result, you can work (at home), game or stream on a stable network with strong signal throughout your home or office.


Do you find 100% copper network cables too expensive? Then you can go for CCA cables. These are the cheaper varieties of network cables. CCA means that the conductors in the cable are made of aluminum with a layer of copper over them. This does increase the chance of signal interference. 


Because you only lay a (home) network once, it is practical to buy a {blog_cat6_cable_on_roll}. That way you can always lay the right distance. 


Unshielded or FTP network cable

Once you've decided on flexible or rigid and 100% copper or CCA, you still need to decide whether to go for an unshielded or shielded (FTP) network cable.


  • Choose a {blog_cat6_patch cable_cca} if no external power factors (magnetic fields) are present around the network cables.
  • Choose a {blog_cat6_patchcables_shielded} if there is a COAX or power or power line cable nearby.


Difference between termination on connectors, socket/patch panel or keystones 

There are several ways to terminate network cables.  

  • Mounting on connectors: With this method you push an RJ45 connector on the ends of the network cable. You plug one end into the router and the other into the smart TV, for example.  
  • Mating to a wall outlet or patch panel: in this method, you push the stiff network cable into the LSA strip of the patch panel using an LSA punch down tool.
  • When terminating on a patch panel, it is important that this is done according to the B standard. Want to see how this works? Then read our article: mounting a patch panel, how to do it? 
  • Terminate on a keystone media box: are you using patch cables to create your home network? Then it is necessary to put keystones on the ends of these cables which have standard RJ45 connectors. You then attach this keystone to the Keystone media box.  

{cta_see_all_keystone_connectors}


{cta_buy_a_keystone_mediabox}


What tools do you need?

To terminate network cables, you need tools.   

  • Buy the LSA punch down tool if you want to install your network with one tool. The punch down tool strips the cables and when pressing the cables into the patch panel or wall outlet, the punch down tool also immediately cuts off the excess piece of cable.  
  • With the digitus terminal block pressing tool, you press the wire pairs of the stripped utp cable into the LSA strip of the patch panel or socket. So with this tool, it is important that you first strip the network cable and then cut the cable to length 


Buy network accessories

There are six types of network accessories   

  1. RJ45 connectors are suitable for flexible and rigid cables. When terminating, you pinch the connector on the cable, creating a connection to the core. 
  2. Keystone: allows you to layout a patch panel or media box and build an RJ45 connection. An RJ45 keystone has a connector on one side that fits an Internet plug. On the other side is an LSA strip where you terminate the cable. 
  3. Wall outlet: the termination of a rigid cable is done on a wall outlet; also known as an in-wall or surface-mount box. Are you opting for an FTP cable? Then make sure you also purchase a shielded wall outlet. Also match the type of cable (6, 6a, 7 or higher) to the type of socket.  
  4. Patch panel: to create connection from the wall outlet to a computer, for example, or you terminate the network cable to a wall outlet? Then you mount the other end of the cable on the LSA strip of the patch panel.  
  5. Keystone media box: the keystone media box is designed to mount keystones. The keystones are attached to the patch cables. 
  6. Switch: you need a switch if you are short of network ports. Generally, a router has 4 ports. With a switch, you can expand the ports to 48, allowing you to connect more devices to the wired network.
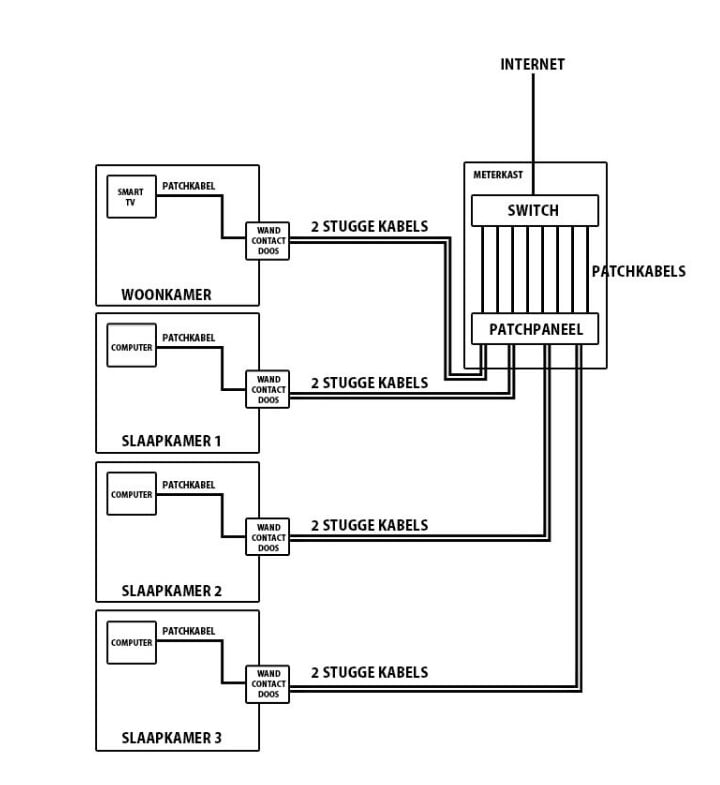
Step-by-step home network connection

Step 1: Determine the rooms 

First, you need to decide which devices you want to connect wired. Then you decide from which point you will lay the network cables. Often this is from the meter box or a server room.  


Step 2: Lay the cables 

Lay the cables from the meter box or server room to the various rooms you determined in Step 1. In most cases, you work your cables away in installation pipes. In new construction, there are often hollow conduits, through which you pull the network cables using a pull spring.  


{cta_buy_trekveer}


In existing houses, you have to drill holes in the walls. Sometimes there is also the option of hiding the network cables behind baseboards. Are these not options in your situation? Then use cable ducts.  


Step 3: Disconnecting the cables

The type of cable (flexible or rigid) determines how you are going to terminate the cables. In the meter box you can use in- or surface-mounted boxes, Keystone media box or a patch panel. If you are working with RJ45 connectors, pinch the connectors on the cables.  


Step 4: Test your internet connection 

Once all cables are laid and disconnected, it is advisable to test the connection. You do this with a cable tester or the complete Network toolset. Is everything working properly? Then you have laid your network properly!
About us

Free professional advice 
Do you still have questions about installing a (home) network after reading this information? Our staff is ready to help you. We can be reached by phone (074 - 852 6448), e-mail ([email protected]) and live chat on weekdays between 08:00 and 17:00. 

Quality and 25-year warranty 
All server and patch cabinets and passive accessories in our range carry a 25-year warranty. All active components have a warranty period of one year. When the item is in good condition and used normally, we guarantee that the device will continue to work as expected. So you are assured of both quality and warranty. 

Fast shipping before 16:00 
Do you order on working days before 16:00 hours? Then we will do everything possible to ship your order the same day. From our 5000m2 warehouse we ship all orders daily. Our large stock makes fast shipping possible. Whitelabel shipping is also included in shipping options.

How many cables fit in a conduit?

How many cables fit in a conduit?

The number of network cables that can fit in a conduit depends on the size of the conduit, the thickness of the cables, and how they are installed. Before starting the installation, it is essential to know how many cables can fit in the conduit, as it is crucial for the safety of the cables and the performance of the network.

Read more

Choosing the right cable

Choosing the right Cable

The old network can no longer handle your current Internet usage: the connection falters during an online work consultation and downloading large files takes forever. If this sounds familiar, your network is in need of an upgrade. Or maybe you're installing a wired network in a new building for the first time. In either case, you're faced with the choice of which utp cable to use from now on. 

Read more

Cable Classifications on Rolls

Cable Classifications on Rolls

The new European standard EN 50575 for the fire behavior of cables has been mandatory since July 1, 2017. The aim of this standard is to reduce the risk of fire. A CPR classification is provided with professional cabling. CPR stands for Construction Products Regulation. By adding this universal classification to professional installation cables, the quality of the cabling can be better guaranteed. We would like to explain what the classification entails.

Read more

In 5 Steps, Connect a Network Cable

In 5 Steps, Connect a Network Cable

You want to set up a new home network or replace the existing network cabling. The time of plastic cable ducts on the skirting boards is over, and you're really making an effort. The new cable must be neatly concealed through walls, floors, or ceilings. Read on to learn how to connect your network cable step by step.

Read more

Keystone Color Codes

Keystone Color Codes

Keystones are extremely useful for providing the necessary connections to a patch panel. They allow you to customize your patch panel with the specific types of connections you need, freeing you from relying on a patch panel with only Cat5e RJ45 connections, for example.

Read more